💳 Stripe Setup
⚙️ Setup
1️⃣ Create a new Stripe account and enable payments
- (I know, boring... see you soon!)
2️⃣ Set your site information
- Go to [Settings] → [Public Details] and add your website URL.
3️⃣ Brand customization
- Go to [Settings] → [Branding] and add your logo and colors.
4️⃣ Enable customer email notifications
- Under [Settings] → [Customer Emails], enable successful payment and refund email notifications.
5️⃣ Enable the Customer Portal
- Under [Settings] → [Customer Portal], activate the portal link (for later use).
6️⃣ Fraud prevention
- In the search bar, type "rules" and click [Fraud Prevention > Rules]
- ✅ Make sure the first 3DS rule is enabled
- 💡 It’s also recommended to enable the second rule
- 🚫 Ensure payments are blocked if CVC check fails
7️⃣ Enable Test Mode
8️⃣ Create a new product
- Add a product and copy its Price ID (e.g. price_1ju5GD464564)
- Add it to config.stripe.plans[0].priceId in your config.js file
9️⃣ Setup API keys
- Go to [Developers], copy your public and secret keys
- Add them to .env.local under STRIPE_PUBLIC_KEY and STRIPE_SECRET_KEY
🌐 Local Webhook
🔟 Setup Webhook locally
- Go to [Developers] → [Webhook] → [Test in local environment]
- After signing in to Stripe CLI, run this command to forward webhook events:
```bash stripe listen --forward-to localhost:3000/api/webhook/stripe ````
- Copy the Webhook Signing Secret and add it to
STRIPE_WEBHOOK_SECRETin.env.local
🚀 Going Live
✅ Copy the webhook signing secret and add it to your .env.local as STRIPE_WEBHOOK_SECRET
⚙️ Production Setup Steps:
1️⃣ Turn off Test Mode in the Stripe dashboard
2️⃣ Under [Developers], copy your keys:
STRIPE_SECRET_KEYSTRIPE_PUBLIC_KEY📥 Add them to your production environment variables
3️⃣ Under [Developers] → [Webhook], click [Add Endpoint]:
- Set endpoint to:
https://yourdomain.com/api/webhook/stripe - ✅ Select event:
checkout.session.completed(add more if needed) - 🔐 Copy the signing secret and add it to
STRIPE_WEBHOOK_SECRETin your production environment
📅 Optional Configuration
4️⃣ Under [Balance] → [Manage Payouts], set a fixed payout date (e.g., 10th of every month)
5️⃣ Under [Settings] → [Customer Emails], enable payment success and refund emails
💳 Creating a Checkout
From the frontend, use the <ButtonCheckout /> component to automatically generate a one-time or subscription checkout session.
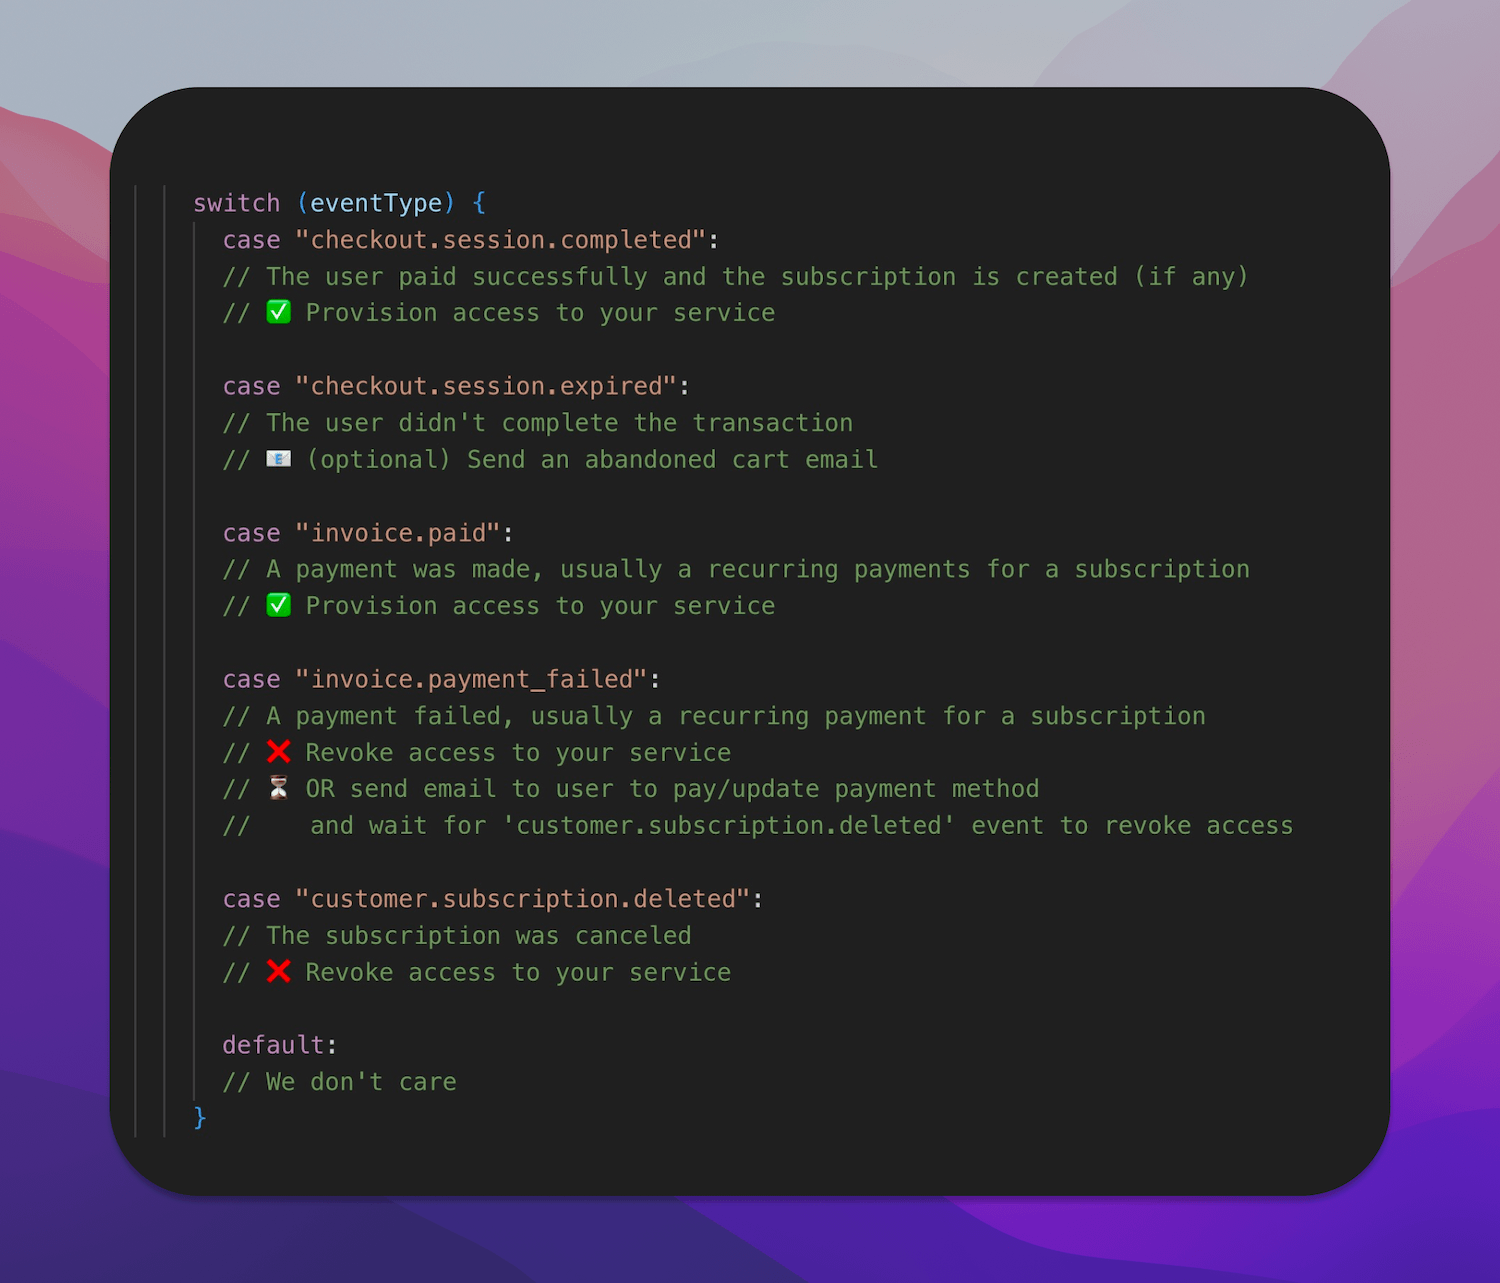
🔄 Webhook & Subscription Handling
Your API listens to Stripe webhook events and updates the user’s access accordingly.
✅ It toggles the value of hasAccess (or has_access in Supabase) to true or false
based on whether the user should have access to paid resources.
💡 You can add your custom logic to the endpoint:
/api/webhook/stripe
Examples:
- Grant user credits
- Send an email with a paid ebook
- Any other logic (e.g. product unlock, discount code delivery, etc.)